Difference between revisions of "Previewing/Adding a car skin (rFactor2)"
(Created page with "right rFactor2 includes a new system for viewing and sharing custom skin files not included within the mods themselves. This is a basic guide on ...") |
|||
| (2 intermediate revisions by one user not shown) | |||
| Line 9: | Line 9: | ||
- Your file name contains the letters ''Alt'' somewhere within it. For example ''AltMySkin.dds''. | - Your file name contains the letters ''Alt'' somewhere within it. For example ''AltMySkin.dds''. | ||
| − | - Your file name must be no longer than | + | - Your file name must be no longer than 12 characters (not including 'alt' or the .dds). |
- Your file name must be unique. | - Your file name must be unique. | ||
| Line 16: | Line 16: | ||
== Step 2 == | == Step 2 == | ||
| − | Go into rFactor2, select your car and press the button labelled 'Tuning' at the bottom of the page. Press the button labelled 'Create Dir' to create a skins folder for this car. The location of this folder is displayed | + | Go into rFactor2, select your car and press the button labelled 'Tuning' at the bottom of the page. Press the button labelled 'Create Dir' to create a skins folder for this car. The location of this folder is displayed under the label 'Loose Skin Directory'. |
| + | |||
| + | [[File:RF2Skins1.jpg|600px]] | ||
== Step 3 == | == Step 3 == | ||
| − | |||
| − | + | Go back to the Tuning page in game and use the arrows to select your skin. Your skin should appear on the displayed car (you may need to press reload first if you've made any additional edits to your files) | |
| − | + | [[File:RF2Skins3.jpg|600px]] | |
== Step 4 == | == Step 4 == | ||
| − | + | If you want others to be able to see your skin online, make sure you have 'Download custom skins' enabled in the rFactor options menu before joining. Note that it may take a few minutes for file transfers to complete on the server (progress is indicated by coloured squares next to a driver's name. | |
| − | + | ||
| − | + | ||
| − | + | ||
| − | + | ||
| − | + | [[File:RF2Skins4.jpg|600px]] | |
| − | |||
[[Category:GPVWC Guides]] | [[Category:GPVWC Guides]] | ||
Latest revision as of 20:46, 27 February 2019
rFactor2 includes a new system for viewing and sharing custom skin files not included within the mods themselves.
This is a basic guide on how to add the skin to rFactor and use it online. For a guide on how to make a car skin see the Car skinning guide.
Step 1
Once you have your skin files made, give them a name based on the following criteria:
- Your file name contains the letters Alt somewhere within it. For example AltMySkin.dds. - Your file name must be no longer than 12 characters (not including 'alt' or the .dds). - Your file name must be unique.
Ensure that any other files (helmets, driver suit etc) are named to match. For example AltMySkinDRIVER.dds.
Step 2
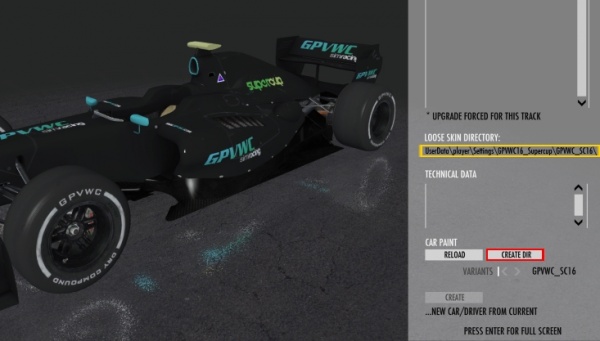
Go into rFactor2, select your car and press the button labelled 'Tuning' at the bottom of the page. Press the button labelled 'Create Dir' to create a skins folder for this car. The location of this folder is displayed under the label 'Loose Skin Directory'.
Step 3
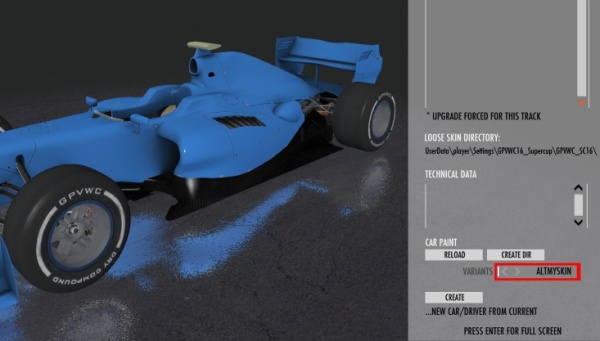
Go back to the Tuning page in game and use the arrows to select your skin. Your skin should appear on the displayed car (you may need to press reload first if you've made any additional edits to your files)
Step 4
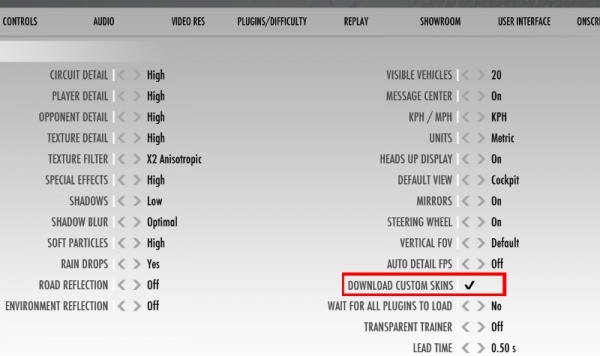
If you want others to be able to see your skin online, make sure you have 'Download custom skins' enabled in the rFactor options menu before joining. Note that it may take a few minutes for file transfers to complete on the server (progress is indicated by coloured squares next to a driver's name.


 del.icio.us
 digg
digg facebook
 googlebookmark
 propeller
 reddit
 slashdot
 stumbleupon